Tim Holtz - Creative Chemistry 101 class - Day 3 - Archival Inks

Created: March 21, 2012
Modified: March 30, 2012

I decided to take Tim's 2 week class - Chemistry 101. These samples are from Day 3.

Archival inks are not something I use very often, hence I only have one of them - BLACK... I think that will be rectified very soon.


Alcohol Agates:

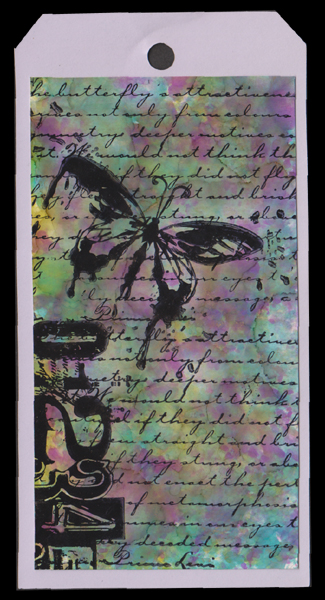
Love alcohol inks and although these aren't colors I usually use, I like the look.

I only use 3 colors, not the 6 that Tim used. I found when I tried with the 6 colors, my background became too dark and I wasn't able to lighten it enough. So eliminated one of the colors, did it again, and still didn't like it, so ended up with the 3 colors - Pool, Citrus, Wild Plum and then Gold Mixative and of course Blending Solution.

I'm working on good glossy cardstock, not sure what brand it was, but it's not Rangers, and I got it eons ago. I know I have Ranger glossy somewhere...

The butterfly and numbers are Tim's stamps, the text is from Stamp it Australia set #034. I adhered the glossy paper to a lavender tag.


Archival Resist:

As I mentioned I only have the one Archival stamp pad, so had to improvise for this technique. I used Staz On, but even with that I only have 3 colors (Olive, Butter Cream, White & Black). Oh well not as flamboyant as Tim's, with his aqua, pink, bright yellow etc.

The background texture stamps I used are from Glitz it Now "Clear Distress". The stamp is inked and rolled onto the glossy paper, giving an added distressed look. The inks dried and then sponged with Distress Broken China & Wild Honey, and then wiped off to expose the stamping.

The man (Tim's clear stamp set) is stamped with black Archival in the normal way. The butterflies (Stamp It set) have the pad only swiped across the surface, giving it a 2nd generation look to the stamping and also done with the black. Glossy paper adhered to an aqua tag.


Reflections Stamping:

Reflection stamping uses a stamp set (Tim's Reflections CMS111)  that has a mirror image of the lettering or numbers. I'm using set #111.

You need to use an embossing folder that has a lot of solid surface parts, so I decided to use the rose/vase folder from Cuttlebug (set # 2001044), stamped the reverse text with Archival black repeatedly to fill the full surface of the folder. Using Tim's technique of slitting a section of the folder, slipped my manila tag in, then embossed as normal. Carefully removed it from the folder and dried it. Sponged with Distress pads (flower area with Worn Lipstick, Broken China, Peeled Paint; edges with Tea Dye & Walnut Stain; then all over with Mustard Seed, Wild Honey and a touch of Spiced Marmalade.

Stamped the "flora" (Hero Arts "Happy Letters" alphabet set) with the black.

Return to TH Chemistry 101 or  to  NittyGritty  Gallery

BACK to see Day 2 or to see Day 4


Home Page Index
(text only)
Glass
Gallery
"And More"
Gallery