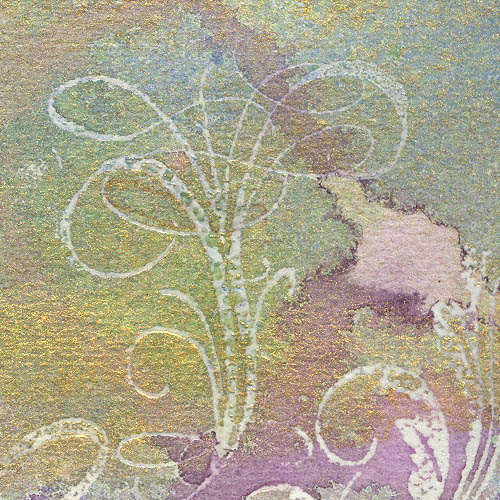
Detail section approx 2.5" square from a larger piece of about 20" x 12"
|
Detail section approx 2.5" square from a larger piece of about 20" x 12" |
|
ID: Radiant Batik Background Technique
Created: August 22, 2008 I love the way this turned out. Another great technique from this book.
I used several brands of Flourish rubber stamps including two from the Quietfire Design set. Arches Text Wove paper (cardstock or watercolor paper can also be used) Clear pigment stamp pad (or Perfect Medium etc) Clear embossing powder Watercolor, inks, dyes etc. I used Magic Color acrylic colours diluted with water - Delta Violet, Mars Red, Chiffon Green & Cobalt Blue Mini Misters Mister with only water Perfect Pearls - Perfect Gold Dilute the Magic colors in mini mister. Two eyedroppers full of 1 color into the mister, then fill to 3/4 full with water. Do this with all four colors. Rubber stamp your paper using the clear stamp pad and then thermal emboss with the clear embossing powder. Mist paper with some water than with the color misters, randomly spraying all over. It's also great if you get blots of color in some areas. I misted with more water till it became slightly puddled so the colors would move when tilted and create streaks and runs etc., When I was happy with the look, I used a hair dryer to speed up drying time. This also moved some of the colors around creating nice hard edges. When the paper was just about dried I mixed up my Perfect Gold, about a good 1/4t to 1/2t with about 4 t of water in a little cup mixed well) and painted the whole paper with it using a foam brush. Going over a section only once, not back and forth. If you miss a few spots, that's ok. Dried again with a hair dryer. I then lay a few pieces of newsprint (not a printed newspaper) over the embossed designs and ironed (on high with a dry setting) to remove the clear embossing. Continued this until all was removed.
|
Return to NittyGritty Gallery
or see the journal made with this paper
"Gold Mine" zip lock coil, comb bound hard cover journal
| Home |
Page
Index (text only) |
Glass Gallery |
"And
More" Gallery |