ID: VSN May 2010 - Bkgr'd Technique - (Mylar) True Gift
5"w
 x 7"h

Created: May 8, 2010
Modified: July 1, 2010
 

This card is in the July 2010 issue of Vamp Stamp Magazine  with the theme of "Background Techniques".

I love using stencils to create backgrounds and this one is a home made stencil using my Button Medallion (see tutorial to make a button medallion HERE)


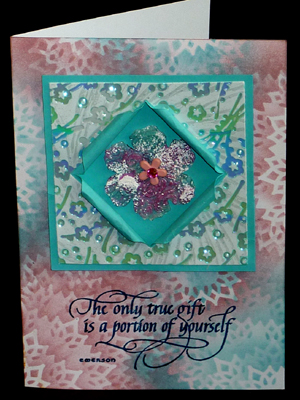
I created several sizes of button medallions using the Martha Stewart, Punch Around the Page, Gothic Arches corner punch #42-50011 on white 110# cardstock. Used 2 colors of Distress stamp pads (Victorian Violet & Broken China) to sponge colors onto my white card. (you'll notice your medallion is getting beautifully colored as well and is great as an embellishment detail). I mainly used one medium sized medallion for around all the edges and then a smaller one as accents here and there. Start with the medallion about 2" into the page, sponge the color from the medallion and then onto your card. Move the medallion slightly off the card and sponge again, either with the same color or the 2nd color, continue moving your medallion off the page and sponging, till there's no where left to go. Pick another portion of your card and repeat the process until your card base is filled. Then lay the smaller  ones on top of sections and sponge around it, it will darken the surrounding areas and make this medallion stand out.

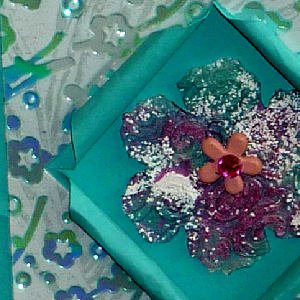
The center square is made from the Shimmer Sheetz (Elizabeth Craft Designs) and is the actual piece of Shimmer Sheetz after using it for 2 other cards. The first 2 operations is, emboss the Shimmer Sheetz with the Asian Bundle "Plum Blossom" folder. Put a piece of Sookwang tape onto one side and adhere to a piece of cardstock, then remove the Shimmer Sheetz and the iridescent layer will be left behind. Portions of the iridescent layer will have Shimmer Sheetz and portions will have the adhesive tape which you can sprinkle Ritz micro fine glitter onto it and burnish. The same procedure was used for the other side of the Shimmer Sheetz embossed side. You are now left with a piece of Shimmer Sheetz that has part of the iridescence removed.

I die cut the square and smaller square (tilted diamond shape) using Spellbinder's Classic Squares large #S4-126. Mounted it to a piece of aqua blue cardstock, trimmed the border to 2/10" all around, cut a diagonal slit, in the diamond center, both ways and used my bead roller (available through Chuck's website) to curl my points and then a small piece of tape to hold them down. Cut another piece of aqua cardstock in a circle to place underneath (thought it was more visibly decorative).

The floral center is done with UTEE. I first made a rubber mold (Suze Weinberg Melt Art Mold n Pour) from a texture plate (Polyform Sculpey Texture Maker Swirls ), then sprinkled various colors of Pipe Dream Ink Opals (Mountain Berry & Bluegum) &  UTEE (Pearl & Clear) into the mold and placed in the oven to melt. Removed from mold when cooled and die cut with Tim's Fantasy Floral die by Sizzix. Used my awl to carefully pierce a hole in the center, added the medium sized floral brad and adhered it to my circle. Adhered it to my main card placing the square opening over the floral to position properly. Adhered my square piece with adhesive 3D squares which I colored with an aqua Tombow marker.

As a final step I rubber stamped my quote (Quietfire Design) with Versafine Deep Lagoon and clear embossed it, and added the rose toned rhinestone.
 

This is a ready made envelope which I stencilled with the same colors and stencil as the card. I then rubber stamped the floral sprig (Hero Arts Clear Design Branch & Leaf #CL224) on the left with Versafine Deep Lagoon & Spanish Moss, then clear embossed it. Rubber stamped the butterfly (Basic Grey All Natural B2 #STA1307) with Brilliance Pearlescent Orchid & Pearlescent Lavender and clear embossed that too.

Wrote in the name and address with both ends of a black Zig Writer. Colored and added gel, Soufflé and glitter on the thick letters.

Added a coat of Dorland's wax and then buffed it.
 

Please use your back button for previous pages or should you wish to go to VSN Gallery  please click the home button

or the Misc Challenges Gallery to see other challenges


or to go to the And More Gallery for hand made greeting cards please click the link below.

More Cards Gallery


Home Page Index
(text only)
Glass
Gallery
"And More"
Gallery