ID: Easel Rosebud Wreath - ECD Make A Wish - HB card
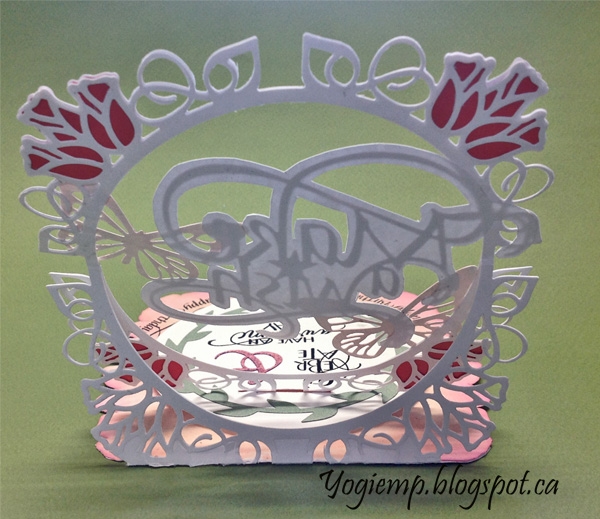
size: 5.75"w x 5.5"H (Easel closed)

Created: April 22, 2018
Modified: June 6, 2018

Suzanne just came out with a new batch of fabulous dies and clear stamps under the Elizabeth Craft Designs label.

I've recently seen easel cards by Crafter's Companion that look fantastic made with their new die sets.  I new I had to try making one with the dies I have on hand... I don't even want to think about what these die sets are going to cost...BIG GRIN.

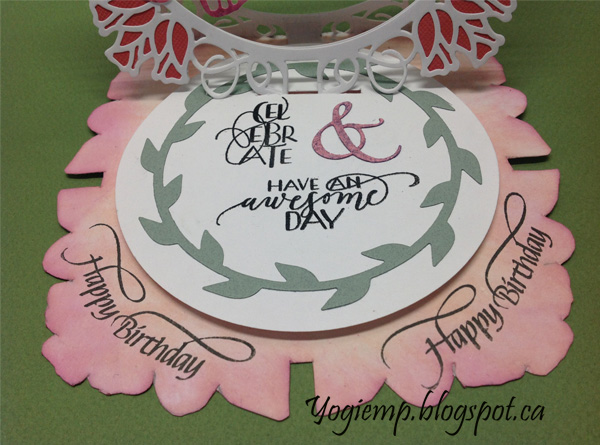
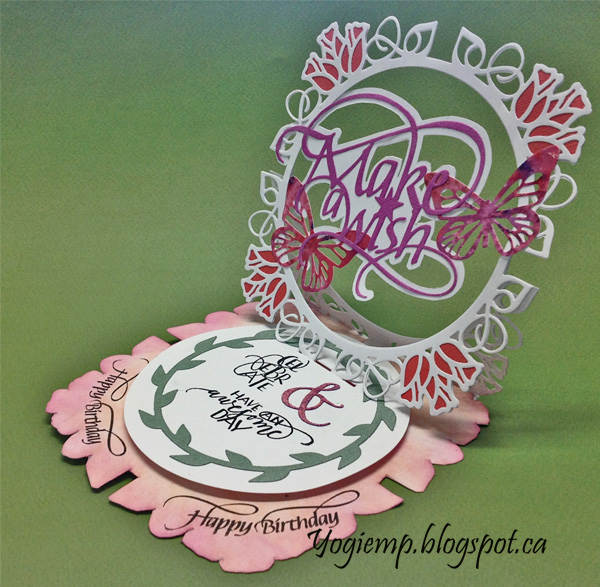
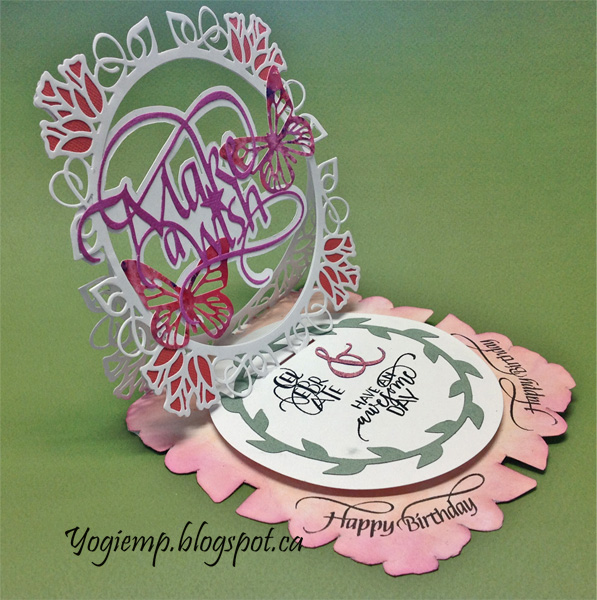
I'm using several a A Way With Words dies  "Rosebud Flourished Wreath" 9pce set, "Flourished Butterfly" 3pce, "Calligraphic Elements 2" 3pce set, "Make A Wish"  from Elizabeth Craft Designs, also available on Quietfire Design HEREHERE, HERE, and HERE HERE, 

And I'm using a clear stamp set from Quietfire Design ("Birthday Collection") also available on Elizabeth Craft Designs HERE

Scored and folded my white cardstock to create my easel structure. Placed the die hanging off the back edge and die cut the top layer. Placed the die on the bottom (floor part) and hand cut around the die matching the die cut placement. Colored direct to paper with Distress "Tattered Rose", then sponged around the edges.

Die cut the wreath again from white cardstock twice more. Die cut the little rosebud inserts from a deep pink textured cardstock and adhered in place on one of the above die cuts. Adhered this layer to the front of the easel card.

The extra die cut I adhered to re-enforce the layers, half on the card base piece and the other half on the top/back of the front piece.

Die cut some butterflies from previously decorated papers done with Brusho's and Color Burst powders. Clear embossed and adhered around the circle.

Die cut the "Make a Wish" from a pink cardstock. inked with Versamark and clear embossed.

Created a shadow layer by cutting around the die shape and some of the larger interior shapes. Adhered both layers together and then onto the circle.


On the floor: Used the drop out circle to create my base. Die cut the leafy circle from the set and adhered to circle.

Used my Tim's Stampin Platform and stamped the text using Versafine Black Onyx and clear embossed.

Die cut the ampersand from another pink cardstock.

Cut a slit in the circle to insert the front to use as my stopper. Adhered the circle to the floor with 3D foam tape.

Stamped the "Happy Birthday" twice. PS: I cut a little 'v' between the flourishes so I cut curve my text...


Please use your back button for previous pages or should you wish to go to the rainbow Maker 2018 Gallery please click on

or to go to the Misc Challenges Card Gallery 2017 click HERE

or to go to the previous Misc Challenges Card Gallery click HERE

or  And More Gallery for other hand made greeting cards please click the link below.

More Cards Gallery


Home Page Index
(text only)
Glass
Gallery
"And More"
Gallery