closed

MC Mar/14 - Accordion Frame Jalopy - The longest - HB
4"H X 8" W  (closed)
 

Created: March 26, 2014
Modified:

Another accordion frame booklet - loving this style...

I found on the web a frame made out of accordion folds and was intrigued. This is the 3rd card I've made with this type of frame. Can you guess I love making them

'm also using a sentiment stamp and a quote stamp from Quietfire Design


I took an 8.5 x 11" piece of white 110# cardstock and smeared it with Distress "Black Soot" to give it a distressed feel. Then I used my Scoring tool and a clear ruler and scored along the 11" side every 1/2". Cut it into two pieces 3.5 & 7.5'. Folded and burnished the folds. Then cut along the center fold line - so now I have 4 pieces for my frame. I used the Soot Pad and ran it along the creases of the accordion both sides. The accordion folds slip into each other at each corner (but work one corner a time) and glue just the outside end pieces. Continue with the other 3 sides.

The cover for the booklet is the the same 110# cardstock which I had sprayed with a can of Black Webbing.

I dry embossed some black cardstock using (Couture Creations "Workshop"; Cuttlebug "Clockworks") embossing folders. Hit the high points with a Versamark pad and then sponging Pan Pastels "white" over it. Adhered to inside of covering. Used a black marker to color the spine areas.

The floor under the frame and the frame cover are the white cardstock embossed with Sizzix "Gears" and high points hit with the Soot pad.


Flap


Cover


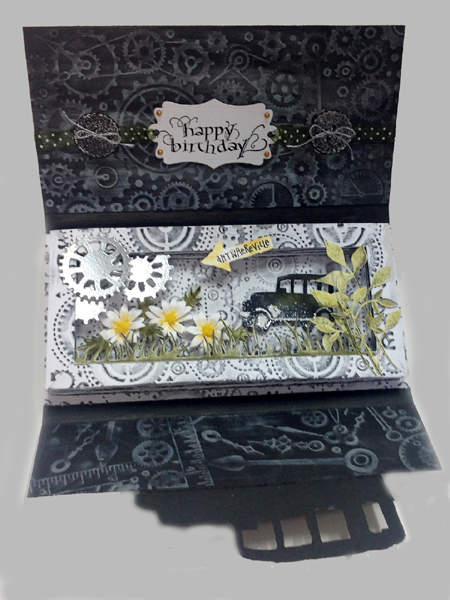
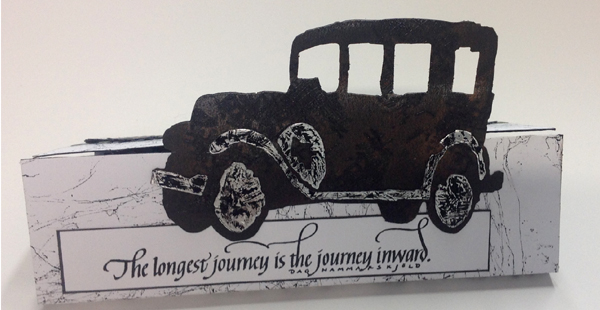
On the flap: I die cut Tim's Sizzix Old Jalopy" from black cardstock and the details from white cardstock covered with Aluminum plumbers tape. I textured the car a bit using a Bo Bunny "Stained Texture" stamp set, Versamrk pad and embossing with brown embossing powder, then rubbed with metallic rub ons in a brownish tone and a touch of silver. The aluminum pieces I distressed with the side of a hammer and then dabbed with Distress black paint dauber, dried, and sanded off the excess.

Stamped the quote with Versafine Black Onyx and clear embossed, trimmed down the white cardstock and edged with a black marker.

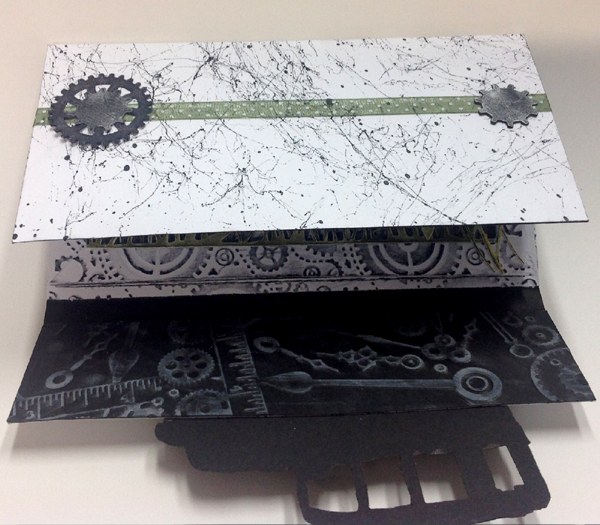
On the cover: I adhered a piece of polka dotted ribbon (I thought was black, but turned out to be a greenish grey color). I die cut the gears (Spellbinders) from black cardstock and rubbed with the metallic rub ons. Adhered them to the front but only partially so the flap can slip under them to stay closed.

I adhered the rest of the ribbon to the inside, leaving the ends free to attach to the word sentiment piece which was stamped with the black, clear embossed and die cut with Spellbinders "Fancy Tags". I added mini gold pearls on the corners.

Die cut some buttons from the black cardstock, large scallop and large round. Embossed the scallop buttons using silver embossing powder which I flicked before heat setting to give the mottled look, then adhered the scalloped button to the round button. Tied a bow using a silver/grey thread.

Die cut a bunch of elements for the scenery: More gears (Spellbinders) and embossed with silver embossing powder. Grass border (Cheery Lynn); Fresh Foliage on the right side (Memory Box); the arrow (Sizzix); The "Mini Daisies" (Sizzix Susan's Garden); Tim's "Old Jalopy" (Sizzix Movers & Shapers die) from black cardstock;

I colored the daisy petals with colored pencils, then tooled each petal with a large balled stylus, then glued all the elements, adding yellow flower soft to the centers.

The grass and foliage colored with Distress "Forest Moss" both sponged and direct to paper.

The jalopy added white embossing powder to the same areas as in the large jalopy. Then clear embossing the whole car.

Adhered all the elements using the folds of the accordion to give it that 3D effect as well as some 3d foam tape for the car.


Detail


Please use your back button for previous pages or should you wish to go to the Calligraphy Gallery please click on


Home Page Index
(text only)
Glass
Gallery
"And More"
Gallery