|
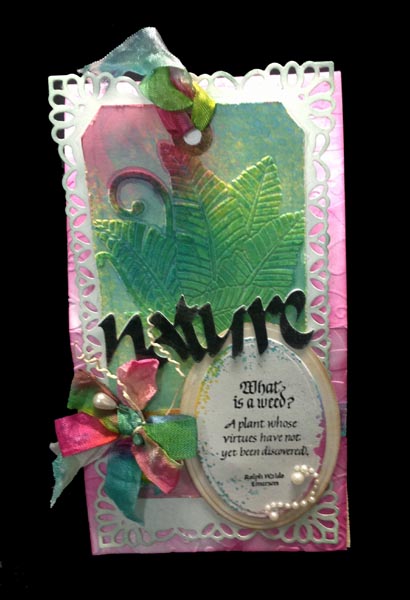
I taped down my Dreamweaver stencil
"Plantain Leaves" LG656 onto a manila tag, then spread Dreamweaver
paste (regular white) all over using the Dreamweaver spreader.
Removed the stencil and plunked it into a basin of water to clean
later... immediately sprayed Distress Stains (put into mini misters)
using "Mustard Seed", "Salty Ocean", "Picked Raspberry" & "Peacock
Feathers". Set this aside to dry.
While the tag was drying, I scored and
folded my white card and spliced more cardstock for the floor.
covered the floor with a beige Ruche paper.
On the front of the easel, I sponged
Distress "Picked Raspberry" all over in different degrees of
intensity, then ran it through my machine with the Crafts Concept
"Christmas Vine" embossing folder (although it doesn't have an Xmas
feel to it...). Repeated the embossing to do the whole front.
Die cut an oversized rectangle to fit
my tag using Spellbinders "Resplendent Rectangle" set. It's got a
repeat pattern so it's quite easy to make different sizes by using
an off the edge cutting technique, which avoids cutting a section
you don't want cut. I then moved my die, matching up the pattern and
continued cutting. Sponged a touch of the green on the edges with a
dirty green sponge. Adhered to card front.
Distressed the edges of my dried tag
using Tim's distress tool, then adhered it to the rectangle.
Bought a roll of Hug Snug off white
seam binding (so glad I did). Put a piece onto my craft sheet and
sprayed with the Distress Stains, dried with heat gun. Tied a piece
in the tag hole and used the rest to tie the bow using a peg bow
maker. Also used a piece to wrap around the card front. Tied bow
with a couple knots from a piece of jute twin and twisted the ends
to create coils. Also inserted a bead headed pin.
Die cut a couple Spellbinders Ovals,
sponging some "Old Paper" on the larger one, adhering it to the card
front and adding a glob of Glossy accents to the pin tip to kind of
hold it in place.
Stamped the quote on the smaller one
with Versafine Black Onyx and clear embossed. It happened to be in
the way of my spraying the ribbon, so got a few spatters on it, so I
figured just continue dipping the edge into the overspill of spray
on my craft sheet. When dry, adhered to larger oval. adding some
pearl flourish. |

Used my electronic cutter for the word
"nature" using "Callgraphy" font. Applied the black stamp pad to
color it and clear embossed a couple times. Adhered to card.
Die cut the sentiment piece with the
same die as for the cover, but this one is a bit more finicky...
It's an off the edge technique again, but on an angle and cut
between designs, so you have to be a bit more careful... Stamped the
sentiment with the black, clear embossed and adhered to floor with with 3D foam
tape. Added the pearl flourishes. as a final touch, punched out some
tiny hearts from some scraps on my desk using the EK success "Card
Suit" border punch. |