|
Detailed Instructions for Open Spine Binding using Buttonhole Stitch You may copy and paste this information into your word processing program or print out a copy. Please only use this info for your own personal use. Read instructions several times to really familiarize yourself with what you're wanting to do. Errors can be avoided that way. Page created: Nov 3, 2006 Page modified: Nov 4, 2006 (cutting drawing for book board) |
| Main Supplies Book board
approx 6" x 9"
|
Extra Supplies
Note: All supplies can be purchased from Quietfire Design. |
NOTES: If you substitute any items the dimensions may vary, so be aware. I would not recommend mat board for these covers, it would be too flimsy, but you could probably substitute the book board by gluing 2 pieces of mat board together and laying a very heavy book over them while drying so as to prevent warping. (I've never tried it, I like book board) Book cloth could probably be substituted with some tightly woven natural fiber cloth like linen or cotton. (again I have not tried that, love the book cloth) |
Waxed linen thread could probably be substituted by embroidery thread or hemp cord etc, but I would wax them for this project. I have no idea about the durability of these threads with this binding. So I highly recommend purchasing the correct supplies if you don't have them and if you want the best results. |
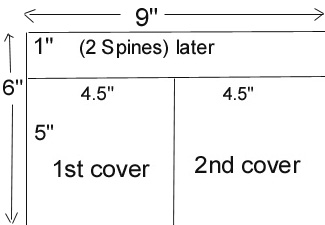
| Covers (as per diagram) to fit alpha
pages 4" h x 4.5"w
NOTE: cut your book board straight, keeping your knife perpendicular to your book board edge, otherwise you'll get an undercut which isn't very nice. Go through the board several times rather than trying to cut it in one shot. Cut 2 pieces of your book board to
Reserve the leftover book board for the spine pieces later on. Use the cut away section from the cover for gluing and using as a spacer later on.
|
Cutting layout for book board (above) Covers
|

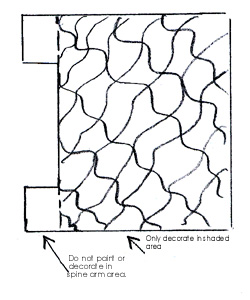
| Decorate your covers both outside and inside and edges,
right up to the spine arm section. Then put
them aside to dry.
When the book cloth is attached later on, and you might have a gap of plain book board showing, color it in with a touch of a marker the color of the book cloth. DO NOT PAINT ANYWHERE IN SPINE ARM SECTION
|
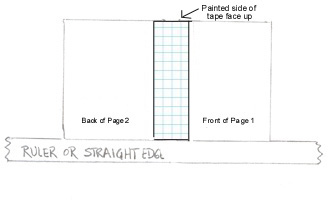
Paint or decorate your linen hinging tape. Note: |
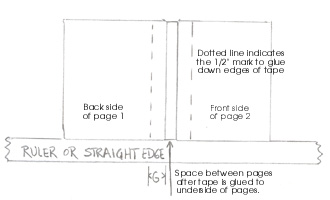
When tape is finished being decorated and is dry, start attaching it to your pages to create signatures. 1) mark off your 1/2" (width "G") section by putting a small mark on the top and bottom edges of your pages, on the front of page 1 and the back of page 2. NOTE: Some people's designs or signing invaded the binding margin. I cut my tape in a semi circle in those areas to go around the invasions. So check each page prior to gluing your tape down. NOTE: put all your pages in sequential order from front to back., exactly how you want the pages for each signatures & don't forget to include your title page and index page etc, if you are making them. Place them in a container or small box, so they don't go out of sequence if you accidentally bump into them. 2) Cut 2 pieces of your tape approx 4" plus a touch. Remove backing of 1 piece of tape. Align a long edge of tape with your marks on the FRONT of page 1. Butt the bottom of both your pages against your ruler, and carefully move your taped page 1 to meet the marks on the BACK of your page 2. You should have about 1/4" gap between the pages 3) Turn your signature over and glue down your second piece of tape matching the edges with the first piece of tape. Press down firmly. Trim away excess tape on the top and bottom edges. The top edges will probably not all be even due to everyone measuring and cutting differently. Adjust that if you want, but be careful not to cut off someone's design. Fold over your page, meeting the fore edges and crease your linen tape. You have now created your first signature... Only 16 more to go.
|
|
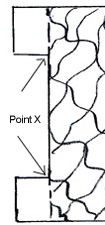
Take one of your covers to make a template for your sewing holes. Also cut a piece of paper (piercing guide) the height "B" of your page (4" x about 1.5"). Fold paper in half length wise (4" x 3/4") Center it along your spine edge cover. Mark your "Point X's" on the crease of your paper, getting them as close to the corner as possible, without going under your spine arms or cover. Then punch a hole with your awl in the crease section. Mark your paper template on the inside of the fold to indicate the bottom edge so you don't accidentally flip the template while marking your holes. Place paper template in your signature, aligning your bottom edges, and punch your holes in the linen tape (use the right size of awl for the thickness of your thread and needle, otherwise you will be struggling when binding). I placed a piece of extra thick, firm "Foamies" on my worktable and pierced into that, since I don't own a binding guide yet. Do this for all signatures, one signature at a time to get the most accurate hole alignment. Put your signatures aside. You are now ready to attach your book cloth.
|
|
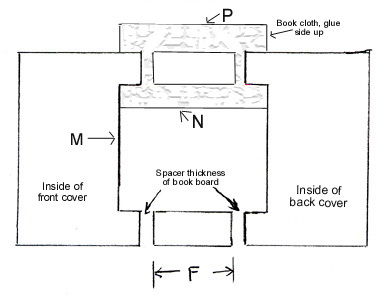
Cut 2 pieces for your spine section from the leftover book board.
Cut 2
pieces of your book cloth PS This is where you're using those saved scrap pieces of book board, for gluing and to place as spacers when you're gluing the book cloth down. Place your covers and spine on your table in this configuration (inside of covers face up). Take one of your pieces of book cloth and glue the wrong side (paper side). (I used Aleene's Tacky white glue). I also used a piece of scrap book board to distribute the glue evenly and not too thickly. Working on the top section. Place your book cloth close to and above your layout, matching the edges with where they will have to land (glue side up). Move your spine piece to about the middle of your book cloth, then both covers, making sure everything is at right angles and straight, and the edges of your book cloth butt up to the edges of your inner open spine edge "M". Fold over book cloth edge "N", so that it almost touches the top edge of your book board. Then fold book cloth edge "P" down. It should be a scant amount away from the bottom edge. Either move your book cloth so this happens or cut away with an x-acto knife, whatever excess there is. When you're happy with the result, press down firmly. Do the bottom section in the same way, bringing the top edge of the cloth down then the bottom of the cloth edge up. This way you don't have any unsightly book cloth edges visible on the outer book edges. Use your bone folder to make creases in the spacer sections, so when the glue is dry your covers will fold more easily. Then, either place a heavy object on the glued areas until dry or clamp with a bunch of bull dog clips. Make sure the spine arms are really glued well to the book cloth. When this is dry, you're ready to bind... |
|
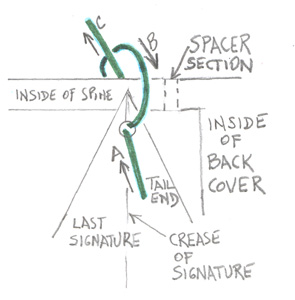
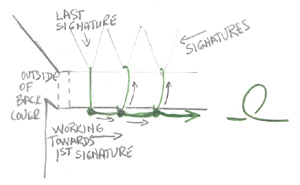
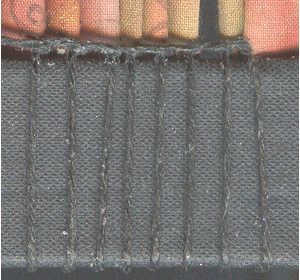
I accidentally miscalculated the length of my waxed thread, but I'm glad I did, because otherwise the length would have been very unruly. Rather than tying up in the last signature, it's tied up in the first and last signature. If you want only one tie up then don't cut your thread. NOTE: When calculating the length of your thread, you need to consider: # of signatures, height of spine piece x 2, thickness of spine piece x 2, space between threads running through signatures, and tail ends, then multiple this all by 2 (top and bottom binding). When you're dealing with only a couple signatures, some of these dimensions are not that necessary, but when dealing with a lot of signatures the little extras start adding up. So cut 2 pieces approx 65". Thread it into a tapestry needle or other non sharp needle. Pic
#1: Your needle is now behind your spine. Bring it over the spine and into the hole of the next signature. Again, notice the loop behind your spine. Put your needle through the loop. Pull snug. NOTE: Now you will also notice at the bottom of your top spine little knots are being formed. Because the pages are various thickness, we want to leave a bit of space between the thread lines/knots. So align your vertical threads with some space between (approx 1/8"+) before pulling snug on the knot, but not too snug. The wax on the thread will help because it acts like a glue and keeps things where you put them. Also be careful that you don't start by having your thread land in the spacer/thickness section but only on the spine board section. Pic #2: Continue going over the spine and into the hole of the next signature, going through the loop formed and pulling snug, till you reach your first signature. NOTE: If there is too much end space between the front spacer section and the first signature, undo your binding and start again putting more space between the vertical threads/signatures. In this first signature you've gone through the hole, and through the loop formed (so the next step doesn't have your thread pulling free). NOW go back into the hole you just came out of. Your needle is now coming into your signature instead of going out of it. Turn your book - BOTTOM SIDE UP - (If you're working with 2 threads, start your second thread now going into the top hole of your first signature, tie off the inside tail end with the first, cutting the excess & continue along at the point of *) now go into the hole at the top, *under and over your spine, through the loop that's formed, pull snug. Over the spine and into the hole of the second signature, through the loop formed, pull snug, and work your way across till you get to the last signature again. You've gone through the hole, and through the loop formed. NOW go back into the hole you just came out of. Your needle is now coming into your signature instead of going out of it. Tie your threads together and trim off the excess. You are now bound!!
|
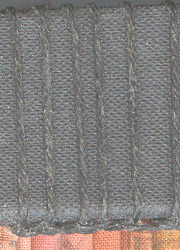
Top binding
This view is your book turned around so the spine is facing you and the signatures are facing away. Back cover is to your left.
Bottom binding |
 pic
#1
pic
#1
 pic
#2
pic
#2
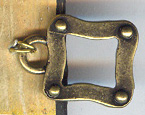
| The book stays in a closed position while standing, but I
wanted a more finished look so I added the Toggle clasp.
I pierced 2 holes in the front cover and wrapped a piece of 26 gauge wire around the eye of the front toggle. I twisted the wires a couple time on the inside of the front cover, trimmed down the ends, pressed it as flat as it would go against the cover, then put a dab of gel medium over the whole wire section, so I wouldn't cut myself or the wire come undone. |

|
To view the Bound Alphabet Book click on link below |
or should you wish to view the ByHand Gallery please click on the link below.
| Home | Page Index (text only) |
top
of the Page |
Glass Gallery |
"And
More" Gallery |